Quick Tip: Bluetooth Mini Speaker


Alpatronix_X-tra_Strong_412737_i0

I just got this amazing little Alpatronix speaker from Amazon, and it is one of the best $30 purchases I have ever made! It fits in the palm of my hand, so it is easy to carry, and it has a really good sound. There is bluetooth capability, which means you can play your iPhone, iPod, or iPad without plugging it in! The range is up to 30 feet. You can plug it into your computer too.

The battery life is supposed to be great, and it has a rechargeable battery. Just plug the speaker into your computer with the cord that comes with it. There are some other cool features too, like a microphone for making calls and more!

Whether you’re in the classroom, speaking at a conference, or at a party, this cool tool is a must have!

21st Century Tool of the Month for August: Thinglink


Thinglink is one of my new favorite 21st Century tools! I’ve been finding new ideas for how to use it in the classroom, and the more I use it, the more versatile I find it to be!

What is Thinglink?

Click here to see a Thinglink which explains what Thinglink is!

Here are some of my favorite ways to use it:

Task Library:

Collect resources for a project or unit of study using thinglink. This shows a task library for a teacher, and a student task library is embedded (a backward plan is also embedded in this thinglink). Students and Teachers can collaboratively add to it.

  Click here to see a post I made about the essential question, “How are people transformed by their relationships with others?” using thinglink to create a task library.


Gameboards: I have used a few “game boards” for classes that I have taught for teachers this summer, which you could easily adapt for classroom use. I used Pages to create the pictures and uploaded them to thinglink. Click on the pictures to see the interactive multimedia embedded.  

Maps: I made this map using lucid chart and thinglink to create the furniture layout I was requesting in a grant to create a 21st century learning lab. I could see this idea being used in the classroom as a seating chart with student pictures and different areas or centers in the room. Students could create little mini movies that describe and/or explain the procedures for different areas in the room and attach it to the map. Then you could turn it into a QR code that guests or new students can scan to learn more about your classroom.


Geography teachers, thiinglink is the perfect tool for you! Interactive maps are one of the best uses for thinglink. Click here to see a post I made using maps and thinglink.


Digital Storytelling:

Thinglink can be used for digital storytelling too. Check out this great thinglink (not created by me) that turns a comic strip into an interactive story.


Here is a resource I created using pages and thinglink for a class I taught about digital storytelling.

Click here to see a post I made about using Thinglink and Screencastify.


Graphic Organizers:

Thinglink is a great tool to use with graphic organizers. Here is how kindergarteners used thinglink to interview their teacher.

Here is an example of first graders who used this thinking map to show the cause and effect in a book.


Share social media:

I have also used thinglink to help people stay connected to me!

How will you use thinglink?


Quick Tip: More Back to School Organization with Google Forms


This is my second ‘Quick Tip’ post about using google forms for organizing back -to-school info. First, I made a post about using google forms as an easy and efficient way for parent volunteers to sign up, which you can read here. But you don’t have to stop there! You can also use google forms to recruit volunteers for classroom parties. If you have a room parent that organizes your classroom parties, with a google form (like the one below), all you have to do is hand them the spreadsheet with responses from a form like this and you are done! Click here to make a copy of this form for yourself. This link will take you to the spreadsheet of responses where you can make your own copy and change it to fit your specific needs. See the first ‘Quick Tip’ post for using google forms here if you need directions on how to do this.

Using a google form is also a really easy way to collect parent information. Caryn, from Mathtechy, commented that she will turn her google forms into QR codes that will be hanging around the room during Back to School Night, and iPads will be available if they don’t have their own devices to scan with. Great idea! In my district, all the information for parents and students is housed in Infinite Campus, but it would be worth the time to create a form where parents submit their email address into a form so that you can easily create an email list without the need for looking them up one by one. Click here for a quick tutorial on how to use a google form to create an email list in about 2 minutes. You could do the same thing for students (if they know their email addresses) to create a student email list!

I hope this helps you organize your back-to-school info!

Quick Tip: Use Google Forms to Organize Your Parent Volunteer Sign Up


bright ideas 2.001

I know it’s hard to believe, but it’s time for many of us to start getting ready to go back to school! But you don’t need to spend a lot of time and money printing papers and mailing them to parents (which may or may not make it back to you). Here is a quick technology tip for getting parent volunteers signed up easily and efficiently.  Click here to watch a tutorial for embedding a google form into your classroom website. Click here to make a copy of this form for yourself! Once you make your own copy, you can personalize it for your classroom. Here’s hoping your ‘Back to School’ rush is productive and efficient!volunteering in the classroom: Use a google form

July’s 21st Century Tool of the Month: PowToon


July’s 21st Century Tool of the Month is PowToon. This is an awesome tool that really speaks for itself when you see it in action! It is a cool animation tool that gives a very polished look without too much effort. PowToon EDU is great for upper elementary students through high school students and adults. (I had 3rd graders choose to use it this year, but not all of them were ready for it.) If you are a GAFE (Google Apps for Education) school, and your students have gmail accounts, PowToon EDU is an add-on in google drive. This makes it easy for students to create an account. Unfortunately, the free version only allows users to publish to YouTube, so if that is not an option for your school, it makes it difficult for students to share their creations.

Here are some ideas for how to use PowToon:

Introduce a lesson: the enduring understanding.


Advertise a workshop.

Create a cover letter for your resume. If your students participate in Ameritown, for example,  they could create a PowToon resume to apply for their jobs.

Click here to see how this 5th grader used PowToon for her spelling homework. (She does have a misspelling–oops!)

Click here to see an app smash: PowToon + Puppet Pals 2

How have you used PowToon? Let’s collaborate! Add your ideas and examples to this padlet.


Quick Tip: Reflector for iPad Instruction


Reflector_iPadInsight

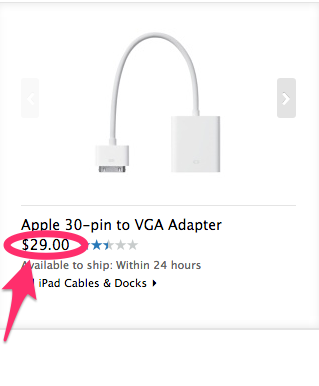
Even in a one-iPad classroom, you need to be able to project your iPad for a large group to see. In my classroom, I was using an adapter piggie that I had to unplug from my computer in order to plug into the iPad. I would have to hold the cord in while I was projecting or it would fall out, and I could only move as far as the cord would stretch (which usually meant leaning over the table while standing on one leg . . . you get the idea!). Then I found reflector.

Screen_Shot_2014-06-26_at_10_39_55_AM

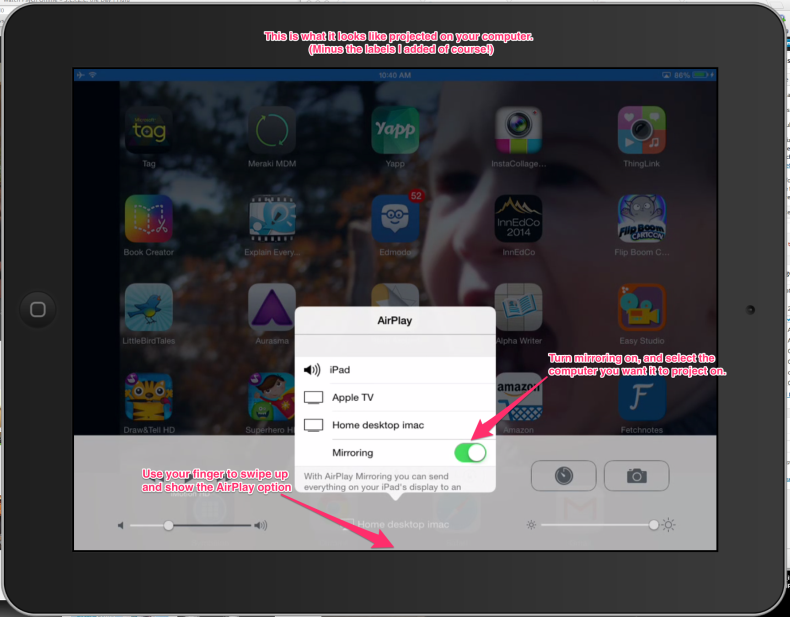
Reflector is an application that you download to your computer. It can wirelessly project any iPad, iPod, iPhone, etc. The device just needs to have airplay mirroring capability. It has been the answer to my iPad problems! Now I can walk around the room while projecting my iPad, and even better, a small group of students using an iPad can project their work for the whole class to see. In fact, multiple devices can be projected at the same time! My students and I tested it out, and we were able to get up to 8 devices to project at once.

This means that if  I am doing a whole group math lesson, for example, I may ask students to solve a math problem in cooperative learning groups of 2 or 3 by recording their thinking and discussion using educreations on the iPad. Then each group can project their iPad at the same time in order to see each group’s answer. If the answers don’t match, we can just ask a group to play the recording of their thinking! What a great way for an authentic class discussion.

Reflector is also a great tool for BYOD schools. The reflector app is downloaded on one computer, and it will project any device that students bring. Yay! No trying to manage what is on their devices! I have also found that it is a great way to do iPad tutorials. I can project my iPad on the computer and record my computer screen using screencastify or quicktime player  in order to show what I am doing on the iPad.

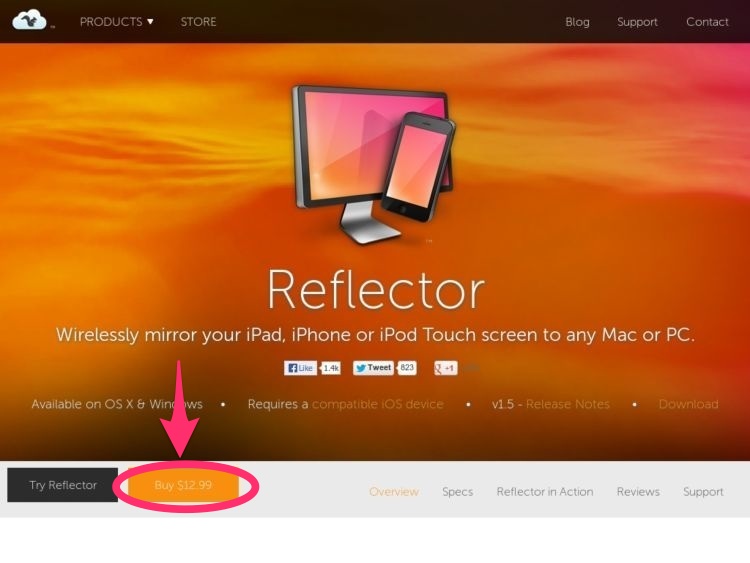
So what does this versatile tool cost, you ask?

reflector_with_cost


Screen_Shot_2014-06-26_at_11_44_50_AM No brainer, right? Please share your ideas on the uses you find for projecting multiple devices in the classroom!

Quick Tip: Tellagami + Green Screen = Moving Background!


May’s 21st century tool of the month was tellagami. Tellagami is a free iPad app that creates cartoon avatars which allow you to type or record your own voice to make the cartoon avatar speak. Because you can save your 30 second video called a “gami” to the camera roll, you can use it to app smash. You can even use tellagami with green screen!

Tellagami is a really popular app to use for app smashing. Here is an app smash using tellagami and tagxedo to introduce the 21st Century Tool of the Month:

May’s 21st Century Tool of the Month: Tellagami

Here are a few of my favorite examples of app smashing with tellagami that I found on YouTube:

App Smashing with Google Earth, Skitch, and Tellagami

App Smashing with Tellagami

Quick Tip: Thinglink and Screencastify


The 21st century tool of the month for June is google apps. This is a quick app-smashing tip about a free google app add-on from the chrome web-store called screencastify and a free program called ThingLink.

Screencastify is a web 2.0 recording tool that gives you the option of embedding a video web-cam in the bottom right hand corner as you record your screen. ThingLink is a multi-media program that you can access on the computer or the iPad. You can use a picture of any background you choose and add  a little bullseye that contains words, videos, or links to other videos anywhere on the screen.

Here are 2 quick lesson ideas for using these tools together:

If you use Daily 5 in your classroom (or any type of reader’s workshop model), then you probably have all the students in your class create goals around a reading strategy that they are focusing on such as Comprehension, Accuracy, Fluency, Extend Vocabulary. In the video above, I used the “rate graph” from the book Balanced Literacy 2nd grade (a book published by Kagan). ThingLink is the perfect program to use when graphing progress over time. Because it embeds links, video, and words, you can actually record a portion of a student reading and embed the little bullseye on the correct place on the graph. This would not only give you and the student a record of their reading rate, for example, but it would also give you and the student data of the change in his/her reading fluency over time. A video placed on the scale in the appropriate place would give the student a better understanding of what it means to be a 2 or a 3 on the rate graph. When the student has 5 points of data that have been collected over time, then he/she can use screencastify to record a self reflection on his/her change over time in the area of focus.

This self-assessment strategy would work well for all reading goals or areas of focus. The Balanced Literacy book has more graphs for different aspects of fluency such as phrasing, expression, rate and accuracy. Linda Dorn has wonderful rubrics for comprehension in her book Teaching for Deep Comprehension that I have used with students, and my favorite vocabulary rubric is Vocabulary Rubrics, Templates, & Graphs for Common Core Instruction from Hello Literacy in the TpT store.

Hello Literacy has a great activity on TpT called Describing & Inferring Details with Picture of the Day: Reading Photos “Closely”. Using this idea of practicing inferring with photos, I used ThingLink and screencastify to record my thinking. This is a great way to make thinking visual! Students could record their thinking with these tools in independently or in small groups during literacy stations.

Thinglink is a cloud-based program that creates a url, which means it can be turned into a QR code. Screencastify can be saved directly to google drive or youtube, both of which create urls as well that can be turned into a QR code. By turning teacher modeling or student thinking into a QR code, you make it visible to others as well.

Hope this quick tip was useful! Please leave a comment on how you will use these 2 programs.

June’s 21st Century Tool of the Month: Google Apps


What are google apps? They include google docs, google forms, google spreadsheets, google presentations . . . you get the idea! Any of those collaborative tools from google that you can access from google drive. You may also have heard the term GAFE (Google Apps for Kids). It’s the same thing, but geared specifically toward students. Google offers school district packages.

I think google apps are absolutely imperative to education in the 21st century. I don’t know what we ever did without it! There are A LOT of great tutorials and explanations out there. If you are brand new to using google apps and looking for a beginners guide to getting started, here are some of my favorite tutorial series:

Tutorials from Anson Alexander

Tech with Jen’s Teacher Training Bootcamp

Google apps also include add-ons from the chrome web store, and more options are being added all the time. This is a really helpful organizational tool for the ease of creating student accounts. When students are logged into their student gmail account, they can access add-ons such as powtoon, voicethread, narrable and automatically set up accounts using the credentials from their account. Trust me, you will be very grateful for that lifesaver!

One of my new favorite add-ons from the chrome web store is fetchnotes. I learned about fetchnotes from this blog post by Teaching With Technology. With fetchnotes, you can add hashtags # to organize your notes in different ways, and you can share your notes with others!

This article from Edutopia, written by Beth Holland, outlines how to apply higher level thinking skills with google docs using the add-on screencastify. It’s brillant! I tried this with 5th graders this year, and they were VERY motivated to do some higher level reflecting!


http://blog.techwithjen.com/search/label/Flubaroo

Here are some amazing teacher organizational add-on tools have been added to the chrome web store: flubaroo, doctopus, goobric, and common curriculum lesson planner. These tools will be huge time-savers and help you on your way to becoming a paperless classroom!

Here are some more of my favorite add-ons with links to the chrome web store:

– Class Dojo

edmodo

storybird

Boom Writer

prezi

glogsterEDU

simplebooklet EDU

powtoon EDU

voicethread

pinterest

padlet

dropbox

Vocabulary Spelling City

Khan academy 

Summer is a great time to get to know google apps, which is why it is our 21st Century tool of the month for June. I promise you will find it worth the time and effort!

April’s 21st Century Tool of the Month: Narrable


21st century tool of the month

Click on the picture or click here for an introduction to Narrable!

Tech Tuesday

Narrable is a fantastic tool to use for storytelling from kindergarten – 12th grade. It’s a great way to allow students to publish their work, and it gives them the option of having a bigger audience to share their stories with. When you create a Narrable, you have the option of keeping your story private, sharing it through email, embedding a link on a website, or even sharing it through social media. Because it creates a url (the www. address), you can turn it into a QR code as well. Then others can use a device to scan the QR code and listen to the Narrable. What a great way to set up a student-created listening center!

I think Narrable is the perfect tool for primary grade students. The simplicity of using it makes it manageable for younger students to do independently, and it gives them the opportunity to put a voice to their writing. If you’ve ever seen a kindergartener or first grader’s writing, you know how important it can be to have a “translation” sometimes! I’ve also seen it as a big success in intermediate grades. The 4th grade teachers at my school were doing a unit on space, and as a formative assessment, they wanted the students to do some research on the solar system and then share what they learned. Because it was a formative assessment, they didn’t want their students to spend a lot of time creating a big presentation, so Narrable was perfect! It allowed the students to create a really nice presentation in just 2 computer lab periods. The first session was just to become familiar with Narrable and find pictures that they wanted to use. The second computer lab session was to record their Narrable. It’s quick and easy but gives students a polished presentation!

I’ll share some ideas about how you can use Narrable here and give you the opportunity to share some of your own ideas too. The creators of Narrable contacted me when they saw a lot of teachers were using it at our school, and they sent me some student examples so that I could share them with you!

1. Click here to see several examples and lesson plans that the creators of Narrable have  shared.

2. Narrate a story: Students can create their own audio book. You can have students practice their reading fluency or read informative books that teach about a topic that you are focusing on. Click here for an example.  Add those student-read stories to your listening library, and you’ve got a great FREE way to beef up your audio book collection! Just use the url or email link that Narrable creates and turn it into a QR code. I like to use QRstuff.com to create QR codes. It’s quick and easy to use.

3. Flip your instruction: Outline important steps that your students might need to listen to more than once. Click here to see the Narrable, “Cite an Online Newspaper or Magazine Article.

3. Write a How-to Story: Have students take a picture of each step of their instructions and then read them for each picture. It makes how-to stories much more powerful with step by step pictures to go along with the words! Click here to see how these first graders recorded directions (although their pictures were not step by step pictures).

4. Persuasive writing: First grade students did some authentic persuasive writing to convince their teacher and principal that they should get a classroom pet! Click here to see the first slide in their Narrable. (The other slides have pictures of their faces, so I’ll just stick to this one to give you an idea!) Note: I saved pictures to a folder in dropbox ahead of time so that the 1st graders could choose from the 3 or 4 choices I gathered. I recommend doing this with K and 1st graders to save a step, and dropbox is an easy, FREE way to share the same pictures on multiple computers at once. I have a school dropbox account set up that I connect all the school computers to so that we can easily share files all year long.

5. Publish a Report: When students write a non-fiction report, have them publish it with Narrable. It makes a great presentation tool, and for the students who struggle with writing, this is a positive way for them to present their ideas clearly to their audience without spelling or handwriting getting in the way. That also makes it easier to assess a child’s content knowledge separate from their writing ability.

6. Field Trip: When you go on a field trip, have each group of students bring a camera, ipad, ipod, iphone–whatever they have access to–and let them be responsible for taking a certain number of pictures during the field trip. You can have each student be responsible for recording something specific that they learned on the field trip. Narrable does have a free app, so if students can use an iphone to take pictures, on the bus ride home, you can have students record their Narrables. It will keep them busy and you’ll have a summary of what they learned by the time you get back to school! Because of budget restraints, you may not have access to ipads or iphones that you can take on a field trip, so let them bring their own! So many students have their own devices, and in elementary school, there is always parent chaperones who are in charge of small groups that can help be responsible for the technology kids bring along. You could also ask the parent chaperone to use their phone. Just give them a heads up when they sign up to be a chaperone that you will need them to bring a phone to take pictures and to download the free app Narrable so students can record as they go or on the way home. Then they can email you the finished Narrable! Note: If you ask parent chaperones to bring a phone with them on the field trip, you should use Remind101 to stay in touch with each group during the field trip. It is a safe, FREE texting service that lets you text parents or students without the need for exchanging cell phone numbers.

7. Digital Class Photo Album: Do you spend hours putting together a slide show that you burn on a CD or DVD to give to the kids at the end of the year? It’s a wonderful, thoughtful gesture, but it just got MUCH easier! Set up a narrable that is your class photo album for the year, and whenever special events or things to remember happen in your classroom, have the students take a picture and add a recording to it right when it happens! You can continue to add to this photo album all year long, but you can have the kids do the work! That will give them ownership, take the work off of your plate, and by having students record their thoughts right after the event happened, you’ll have that excitement captured forever! You can easily email the link to everyone in your class so that they all have the Digital Class Photo Album as a keepsake of your year together!

8. Get-to-know-you Class Building Activity: At the beginning of the year, you could have the students take a picture of themselves and record something special on a class Narrable. This would give you and your class a lasting introduction to each other that they can listen to again and again. Also, if you have new students join your class during the school year, you can give him/her the link to the class Narrable so that he/she can get to know classmates before meeting them. The new student can also add his/her picture and something special about himself/herself so that the class can have an introduction to the new student without the need for the new student to stand up in front of the class to share it (which can be embarrassing for some students!).

9. Center Instructions: Do you use Daily 5, Literacy Work Stations, or Math Work Stations in your classroom? If you do any kind of Reader’s Workshop or Math Workshop, you have probably had a problem with students remembering the instructions at each center, or you’ve spent several days setting up each center and helping students learn the procedures. Narrable can save you a lot of that instructional time. Record your instructions using a picture of your students correctly using the center, and turn it into a QR code and place it somewhere near the work station. Even your youngest students will not need to bother you during reading group instruction to ask you what they are supposed to do–all they have to do is scan the instructions and listen!

10. Let’s collaborate! Click here to add your ideas and examples to this padlet. We can all have a growing bank of resources if we share our ideas here.